Why Hands-On Cable Crimping Matters for CompTIA A+ and Network+
If you are studying for the CompTIA A+ (220-1101) or CompTIA Network+ (N10-009) exam, network cabling is one of the most heavily tested topics — and one of the hardest to learn from a textbook alone. The A+ exam dedicates an entire objective domain to networking, covering cable types, connector identification, wiring standards, and troubleshooting. The Network+ exam goes deeper into structured cabling, TIA/EIA-568 standards, and cable management best practices.
The problem with studying cabling purely from flashcards or video lectures is that it remains abstract. You memorize "white-orange, orange, white-green, blue, white-blue, green, white-brown, brown" as the T-568B wire order, but without physically arranging those wires in your hands, the sequence is easy to confuse under exam pressure. Candidates who practice hands-on cable termination consistently report higher confidence and better scores on networking questions.
What the CompTIA Exams Test About Network Cabling
Before choosing a kit, it helps to understand exactly what the exams expect you to know.
CompTIA A+ (220-1101) — Networking Objectives
The A+ Core 1 exam covers these cabling topics in Objective 2.0 (Networking):
- Cable types: Cat5, Cat5e, Cat6, Cat6a — their maximum speeds, distances, and use cases
- Connector types: RJ45 (8P8C) for Ethernet, RJ11 (6P2C/6P4C) for telephone, and how to visually identify each
- Wiring standards: T-568A and T-568B — which wires go to which pins
- Cable configurations: Straight-through cables (same standard on both ends) vs crossover cables (different standard on each end)
- Troubleshooting: Using a cable tester to identify opens, shorts, and miswired connections
- Shielded vs unshielded: STP vs UTP cable and when each is appropriate
CompTIA Network+ (N10-009) — Cabling Objectives
The Network+ exam goes beyond identification into implementation and design:
- Structured cabling: TIA/EIA-568 standards for commercial building cabling infrastructure
- Cable management: Proper routing, bend radius, and avoiding sources of electromagnetic interference (EMI)
- Termination: Patch panels, keystone jacks, punch-down blocks, and proper crimping technique
- Testing and certification: Using cable testers, certifiers, and understanding test results
- Copper vs fiber: When to use each and their respective advantages
- Cable categories: Performance specifications and maximum segment lengths
Hands-on practice with a crimping kit directly reinforces all of these objectives. Let's look at the 5 best kits for exam candidates in 2026.

Solsop Pass Through RJ45 Crimp Tool Kit All-in-One Ethernet Crimper Cat7 Cat6 Cat5
by Solsop
$35.99
- Pass-through RJ45 crimping with ratcheting mechanism for consistent, professional-grade terminations every time
- All-in-one kit includes crimper, cable tester, wire stripper, and 50 pass-through Cat5/Cat6 connectors
- Supports Cat5, Cat5e, Cat6, and Cat7 cables with both RJ45 and RJ11 die heads
Pass-Through vs Standard RJ45 Crimping: Which Should You Learn?
This is one of the most practical decisions you will make when choosing a crimping kit, and understanding the difference is valuable exam knowledge.
Standard Crimping
With standard (non-pass-through) RJ45 connectors, you must:
- Strip the cable jacket back approximately 1 inch
- Untwist and arrange the 8 wires in the correct color order
- Cut the wires to exactly the right length (about 0.5 inches beyond the jacket)
- Insert the wires into the connector until each wire touches the gold contact at the front
- Crimp the connector
The critical step is #3. If you cut the wires too short, they will not reach the contacts. If you cut them too long, the cable jacket will not seat under the strain relief crimp, creating a weak connection. This precision cutting is the #1 cause of failed terminations for beginners.
Pass-Through Crimping
With pass-through connectors, the process changes:
- Strip the cable jacket back approximately 1.5 inches (more room to work)
- Untwist and arrange the 8 wires in the correct color order
- Insert the wires into the connector — the wires pass completely through and extend out the front
- Visually verify every wire is in the correct position and fully seated
- Crimp the connector — the tool cuts the excess wire flush with the connector face
The key advantage is step #4: you can see and verify the wire order before committing to the crimp. With standard connectors, you are guessing (or hoping) that every wire is properly seated inside the opaque connector body.
Pass-through crimping reduces failed terminations dramatically, especially for beginners. The Solsop kit (Product #1) is specifically designed for pass-through connectors and is our top recommendation for exam candidates.

Professional Network Cable Crimping Tool Kit 9in1 Cat5/5e Cat6
by Generic
$25.99
- 9-in-1 professional kit with crimper, cable tester, punch-down tool, stripper, and assorted connectors
- Includes both RJ45 and RJ11 crimping dies for Ethernet and telephone cable termination
- Built-in cable tester with remote unit verifies continuity and pin mapping on all 8 conductors
Understanding T-568A vs T-568B Wiring Standards
This is one of the highest-frequency topics on both CompTIA exams. You must know both wire orders cold.
T-568B Wire Order (Most Common in the U.S.)
| Pin | Wire Color |
|---|---|
| 1 | White/Orange |
| 2 | Orange |
| 3 | White/Green |
| 4 | Blue |
| 5 | White/Blue |
| 6 | Green |
| 7 | White/Brown |
| 8 | Brown |
T-568A Wire Order
| Pin | Wire Color |
|---|---|
| 1 | White/Green |
| 2 | Green |
| 3 | White/Orange |
| 4 | Blue |
| 5 | White/Blue |
| 6 | Orange |
| 7 | White/Brown |
| 8 | Brown |
Notice the pattern: T-568A and T-568B are identical except the orange pair and green pair swap positions. Pins 4, 5, 7, and 8 (the blue and brown pairs) stay in the same position in both standards.
Straight-Through vs Crossover Cables
- Straight-through cable: Both ends wired to the same standard (both T-568A, or both T-568B). Used for connecting different devices — computer to switch, switch to router.
- Crossover cable: One end wired to T-568A, the other to T-568B. Used for connecting similar devices — computer to computer, switch to switch.
Modern network devices with Auto-MDI/MDIX can automatically detect and adjust for either cable type, but the exam still tests your knowledge of when each is traditionally used. Building both types with your crimping kit is the fastest way to internalize the difference.

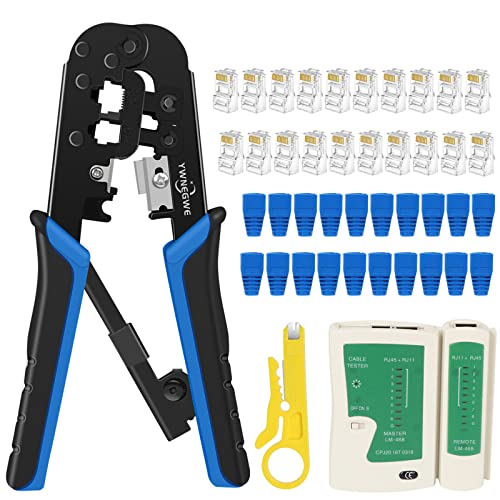
LEATBUY CAT5 Crimper Tool Kit for RJ45/RJ11/RJ12/CAT6/Cat5e
by LEATBUY
$19.99
- Budget-friendly crimper kit supporting RJ45, RJ11, and RJ12 connectors for versatile cable termination
- Includes cable stripper, crimping tool, and assorted connectors for Cat5e and Cat6 cables
- Ergonomic handle design reduces hand fatigue during extended crimping sessions
RJ45 vs RJ11: Know Your Connectors
Both connector types appear on the CompTIA A+ exam, and your crimping kit should handle both.
RJ45 (8P8C)
- 8 positions, 8 contacts — all 8 pins are wired
- Used for Ethernet networking (Cat5e, Cat6, Cat6a cables)
- Larger connector — approximately 11.68mm wide
- The standard connector for all modern wired network connections
RJ11 (6P2C or 6P4C)
- 6 positions, 2 or 4 contacts — not all positions are wired
- Used for telephone lines (POTS — Plain Old Telephone Service)
- Also used for DSL connections and some legacy modem connections
- Smaller connector — approximately 9.65mm wide
- Physically fits into an RJ45 jack (but should not be used that way — it can damage the RJ45 jack contacts)
Why This Matters on the Exam
The CompTIA A+ exam includes questions that show you a photo of a connector and ask you to identify it, or describe a scenario where the wrong connector type is causing a problem. Having physically handled both connector types makes these questions trivial. All five kits reviewed in this guide include both RJ45 and RJ11 crimping capability.
Cable Categories: Cat5e, Cat6, and Cat6a
Understanding cable categories is critical for both exams. Here is what you need to know:
| Category | Max Speed | Max Distance | Frequency | Key Feature |
|---|---|---|---|---|
| Cat5e | 1 Gbps | 100m | 100 MHz | Most affordable, widely deployed |
| Cat6 | 10 Gbps | 55m (10G) / 100m (1G) | 250 MHz | Center spline separator, tighter twists |
| Cat6a | 10 Gbps | 100m | 500 MHz | Augmented shielding, thickest cable |
What You Feel When Crimping Each Category
This is knowledge you can only get hands-on:
- Cat5e is the thinnest and most flexible. The wires separate easily, and the jacket strips cleanly. It is the most forgiving cable to terminate and the best starting point for beginners.
- Cat6 is noticeably stiffer due to the center spline (a plastic cross-shaped separator between the wire pairs). You need to cut out the spline before arranging wires, which adds a step. The tighter twist rate makes wire arrangement slightly harder.
- Cat6a is the thickest and stiffest. The heavier jacket and additional shielding make it physically harder to strip and insert into connectors. Working with Cat6a teaches you why proper cable management and strain relief matter.

RJ45 Crimp Tool Kit All-in-One Ethernet Crimper Cat6 Cat5 Cat5e with Cable Tester
by Generic
$29.99
- Complete all-in-one kit with crimper, cable tester, wire stripper, and RJ45/RJ11 connectors included
- Cable tester with LED indicators verifies all 8 pins for correct wiring and continuity
- Compatible with Cat5, Cat5e, and Cat6 Ethernet cables for home and commercial network builds
Shielded vs Unshielded Twisted Pair: STP and UTP
Unshielded Twisted Pair (UTP)
UTP cable relies entirely on the twist rate of its wire pairs to reject electromagnetic interference. Each pair is twisted at a slightly different rate, which causes external interference to affect both wires in the pair equally — the receiving equipment then cancels out the common-mode noise. UTP is the default choice for:
- Office networks
- Residential installations
- Most data center horizontal cabling
- Any environment without significant EMI sources
Shielded Twisted Pair (STP)
STP adds a metallic shield — foil (FTP), braided wire (STP), or both (S/FTP) — around individual pairs or the entire cable bundle. This provides additional EMI protection for:
- Industrial environments (factory floors with heavy machinery)
- Hospital environments (near MRI equipment)
- Runs parallel to electrical power cables
- High-security installations requiring emission control
Important for the exam: STP cables require shielded RJ45 connectors and proper grounding at both ends of the cable run. If the shield is not grounded, it acts as an antenna and can actually increase interference. Standard crimping kits include unshielded connectors, which is appropriate for practice since the vast majority of installations use UTP cable.
Using a Cable Tester: Verify Every Termination
Every crimping kit in this guide includes a cable tester, and for good reason — a cable tester is the only way to confirm your termination is correct. Visually inspecting the connector is not reliable because a wire that appears seated may not be making contact with the gold pin.
How a Basic Cable Tester Works
A basic cable tester has two units: a main unit and a remote unit. You connect one end of the cable to each unit. The tester sends a signal sequentially through each of the 8 conductors and lights up corresponding LEDs.
- All 8 LEDs light in order (1-2-3-4-5-6-7-8): Cable is correctly wired with proper continuity
- LEDs light out of order (e.g., 1-2-6-4-5-3-7-8): Wires are crossed — the green and orange pairs are likely swapped (this would indicate you accidentally mixed T-568A and T-568B on the same end)
- An LED does not light: That conductor has no continuity — the wire did not seat into the connector pin. Re-crimp or re-terminate that end.
- Two LEDs light simultaneously: Two wires are shorted together — they are touching inside the connector
What the Exam Tests About Cable Testing
Both CompTIA exams include troubleshooting scenarios where you need to identify cabling problems based on symptoms:
- Intermittent connectivity: Often caused by a wire that barely makes contact — the connection works when the cable is still but fails when moved
- No link light on the switch port: Complete open on one or more conductors needed for the link
- Slow speeds (100 Mbps instead of 1 Gbps): Only pairs 1-2 and 3-6 are connected (enough for 100BASE-TX but not for 1000BASE-T, which requires all 4 pairs)
- Crosstalk errors: Wires from different pairs are on the same pin, or excessive untwisting during termination
RJ45 Crimping Tool Kit Ethernet Crimp Set with 20PCS CAT5 Connectors
by Generic
$17.99
- Most affordable entry-level crimping kit — ideal for students on a tight budget who need basic practice
- Includes crimping tool, 20 RJ45 connectors, cable stripper, and carrying case
- Compact and portable kit for hands-on CompTIA A+ and Network+ exam study sessions
Step-by-Step: How to Crimp an RJ45 Connector
Here is the complete termination process, matching the technique you will describe on the exam:
Step 1: Strip the Cable Jacket
Use the cable stripper included in your kit. Score the jacket approximately 1-1.5 inches from the end (more for pass-through connectors, less for standard). Rotate the stripper around the cable, then pull the jacket off. Be careful not to nick the individual wire insulation — a damaged wire can cause intermittent failures that are extremely difficult to troubleshoot.
Step 2: Untwist and Arrange the Wires
Untwist all four pairs and arrange them flat in the correct color order for your chosen standard (T-568A or T-568B). Keep the wires as flat and parallel as possible. Minimize the amount of untwisting — the exam tests this concept: excessive untwisting increases crosstalk because you are reducing the interference-canceling effect of the twist.
Step 3: Trim the Wires (Standard Connectors Only)
For standard connectors, cut the wires to approximately 0.5 inches beyond the jacket. For pass-through connectors, skip this step — the wires will be cut by the crimp tool.
Step 4: Insert Wires into the Connector
Hold the RJ45 connector with the clip facing away from you and the gold contacts facing up. Slide the wires into the connector channels. For standard connectors, push until each wire touches the front wall. For pass-through connectors, push until all 8 wires extend out the front.
Step 5: Verify Wire Order
This is critical. Look at the connector from the front and verify each wire is in the correct position. With pass-through connectors, you can see the wire colors extending out the front, making verification easy.
Step 6: Crimp
Insert the connector into the crimping tool and squeeze firmly. A ratcheting crimper (included in most kits) will not release until full compression is achieved, ensuring consistent crimps. The tool presses the gold contacts down through the wire insulation to make electrical contact and clamps the strain relief onto the cable jacket.
Step 7: Test
Connect both ends to your cable tester and verify all 8 conductors. If any conductor fails, cut off the bad connector and re-terminate. With practice, your success rate will exceed 95%.
Comparing the 5 Best Crimping Kits for Exam Candidates
Here is how the five kits compare across the factors that matter most for CompTIA A+ and Network+ study:
| Feature | Solsop ($35.99) | 9-in-1 ($25.99) | LEATBUY ($19.99) | All-in-One ($29.99) | Budget ($17.99) |
|---|---|---|---|---|---|
| Pass-Through | Yes | No | No | No | No |
| Cable Tester | Yes | Yes | No | Yes | No |
| Punch-Down Tool | No | Yes | No | No | No |
| RJ45 + RJ11 | Yes | Yes | Yes | Yes | Yes |
| Connectors Included | 50 | Assorted | Assorted | Assorted | 20 |
| Best For | Beginners | All-rounders | Budget learners | Mid-range value | Tight budgets |
Our Recommendation
For CompTIA A+ and Network+ exam candidates, the Solsop Pass Through Kit ($35.99) offers the best learning experience. The pass-through connectors eliminate the most frustrating failure mode for beginners (wires not seating properly), and the included cable tester lets you verify every termination — which directly practices a skill tested on both exams.
If you want the most complete toolkit and are comfortable with standard (non-pass-through) connectors, the 9-in-1 Professional Kit ($25.99) adds a punch-down tool for keystone jack and patch panel termination, which is a Network+ topic.
If budget is the primary concern, the LEATBUY Kit ($19.99) or the Budget Kit ($17.99) give you the essential crimper and connectors to start practicing. You can always buy a standalone cable tester later for $8-$12.
TIA/EIA-568 Structured Cabling Standards
The Network+ exam specifically tests TIA/EIA-568, the standard that governs structured cabling in commercial buildings. While you will not build a full structured cabling system with a crimping kit, understanding the standard provides context for why you crimp cables the way you do.
Key TIA/EIA-568 Concepts for Network+
- Horizontal cabling: The cables that run from the telecommunications room (TR) to individual work area outlets. Maximum 90 meters of permanent link, plus 10 meters of patch cords (5 meters at each end), for a total channel length of 100 meters.
- Backbone cabling: The cables that connect telecommunications rooms to each other and to the main equipment room.
- Patch panels: Centralized termination points in the TR where horizontal cables terminate. Cables are punched down on the back of the patch panel, and patch cords connect the front to switch ports.
- Keystone jacks: The modular connectors installed in wall plates at work area outlets. Cables are punched down onto the keystone jack, and the user connects a patch cord from the jack to their device.
- Cable management: Proper routing with attention to bend radius (minimum 4x the cable diameter for UTP), separation from power cables (minimum 5 inches for unshielded), and support intervals.
Your crimping kit teaches the termination fundamentals. A punch-down tool (included in the 9-in-1 kit) teaches the patch panel and keystone jack side of the equation.
Wire Gauge and Its Impact on Performance
All standard Ethernet cables (Cat5e through Cat6a) use 23 or 24 AWG (American Wire Gauge) solid copper conductors for permanent horizontal runs, and stranded conductors of the same gauge for patch cords.
- Solid conductors are a single strand of copper. They hold their shape when inserted into punchdown terminals and IDC (insulation displacement) connectors. Solid cable is used for permanent in-wall and in-ceiling runs.
- Stranded conductors are multiple thin copper strands twisted together. They are more flexible and resist fatigue from repeated bending. Stranded cable is used for patch cords that are frequently plugged, unplugged, and moved.
For crimping practice: Use stranded patch cable. It is more flexible and easier to handle, and it is what you will be making in real IT work (custom-length patch cords). Solid cable is harder to crimp because the individual conductors are stiffer and resist bending into the connector channels.
Troubleshooting Common Crimping Mistakes
Building cables that fail is part of the learning process. Here are the most common errors and how to fix them:
Wire Not Seated (Open Conductor)
Symptom: Cable tester shows one or more LEDs not lighting. Cause: The wire did not reach the gold contact at the front of the connector. Fix: Cut off the connector and re-terminate. With pass-through connectors, this error is nearly eliminated because you can see the wires extending through.
Crossed Pairs (Wrong Wire Order)
Symptom: Cable tester LEDs light out of sequence. Cause: Two wires are in the wrong position — typically the orange and green pairs are swapped (you accidentally used T-568A order instead of T-568B, or vice versa). Fix: Cut off the connector and re-terminate with the correct wire order.
Split Pairs
Symptom: Cable tester shows all 8 LEDs lighting in order, but network performance is poor (high error rates, slow speeds). Cause: Wires from different pairs are paired together on the same pins. For example, pin 3 has white/green but pin 6 has white/orange instead of green. A basic cable tester checks continuity and pin mapping but cannot detect split pairs — you need an advanced cable tester or certifier. Fix: This is an advanced troubleshooting topic tested on Network+. The key concept is that basic cable testers have limitations.
Excessive Untwisting
Symptom: Cable passes basic testing but experiences crosstalk and errors under load. Cause: Too much of the wire pair twist was removed during termination. TIA/EIA-568 specifies a maximum of 0.5 inches (13mm) of untwisting at the termination point for Cat6. Fix: Re-terminate with minimal untwisting. Maintain the pair twists as close to the connector as possible.
Building Your Study Lab: Beyond the Crimping Kit
A crimping kit is the foundation of hands-on networking study. Here is what else you can add to build a complete home study lab for CompTIA A+ and Network+:
- Small Ethernet switch (5-port unmanaged): $15-$20. Lets you test your cables by actually connecting devices and verifying link lights.
- 25-foot bulk Cat5e cable: $5-$8. Enough cable for 10+ practice terminations.
- 25-foot bulk Cat6 cable: $8-$12. Practice with the stiffer, splined cable.
- Keystone jacks and wall plate: $5-$10. Practice punch-down termination (Network+ topic).
- Cable labels and velcro ties: $5. Practice proper cable management and labeling.
Total investment: approximately $50-$75 for a complete hands-on study lab, plus the crimping kit itself. This is a fraction of the cost of a single exam voucher ($358 for A+, $369 for Network+) and dramatically improves your chances of passing on the first attempt.
Start Practicing Today
Cable crimping is one of those skills that looks complicated on paper but becomes intuitive with practice. After 5-10 successful terminations, the wire order becomes muscle memory, and exam questions about cabling feel like common sense rather than memorization.
Pick up any of the kits reviewed above, grab a length of Cat5e cable, and start building. Test every cable. Diagnose your failures. By the time you sit for the CompTIA A+ or Network+ exam, cabling questions will be free points.
As an Amazon Associate, OpenExamPrep earns from qualifying purchases. All recommendations are based on editorial review.